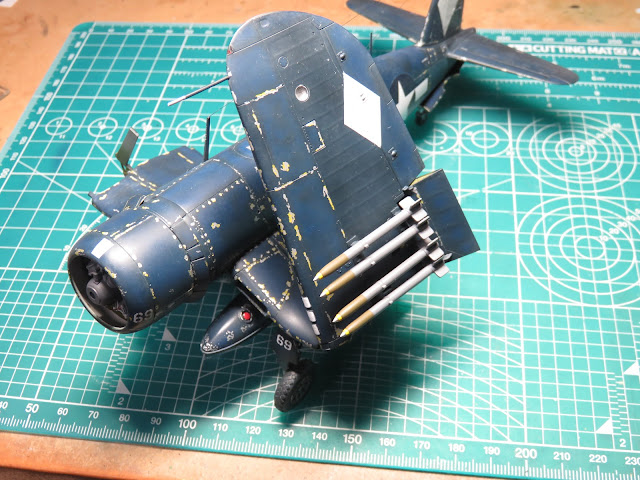
Well, here is my first posting for 2024. It's hard to believe that this kit is nearly completed. There's not too much left to build, the majority of work now is building the small pieces and finally assembling the rest of the parts to the aircraft. I'm excited to see this finally finished, so let's get started!
I'm first going to add the identification lights that I drilled out under the wing. To fill these in I used Tamiya Multipurpose Cement Clear and added a drop of Tamiya X-25 Clear Green. I mixed this together thoroughly. If the glue is too thick you can thin it down a bit with some water.
Using a thin pointed brush I was able to pool the glue into the opening. I painted the inside silver so that the clear paints would reflect better. I think I used a bit too much Clear Green as it's pretty dark, so with that color a little goes a long way.
And here is the finished result. I used all Tamiya paints to color the glue, X-26 Clear Orange, X-25 Clear Green, and X-27 Clear Red. Also, there are blue lights on the tops of the wings, for those I used X-23 Clear Blue.
For the HVAR Rockets, I used several different paints, I started by painting the olive drab sections with Mr. Color 304 Olive Drab. After I masked this section I painted the rest with AK Interactive Neutral Grey 43 (RC261).
I tried to mask off the yellow tips, but that was a lesson in futility. So in the end I decided to paint the last details by hand. Yellow is a really difficult color to airbrush and even more difficult to hand brush, so my go to yellow for hand brushing is Formula P3 Cygnus Yellow. It's very easy to hand brush and it's a lovely bright tone.
Lastly for the tips I used Mr. Color 8 Silver, and with that these rockets were now ready to be glued to the pylons on the wings.
There is an extension on the antenna that connects to the rudder. I couldn't find out exactly what this was, but I decided to replicate it using some 0.05mm wire and wrapping 0.02mm copper wire around it creating a small spring in the same way I did on the landing gears. After it was glued I painted it with Tamiya XF-56 Metallic Grey.
For the antenna line, I used elastic thread from Ushi van der Rosten. This was attached using Mr. Hobby, Mr. Just super glue. This stuff takes a bit of practice to get the hang of as it's very thin and in the winter it reacts to static. But once it's on it adds a really cool level of detail. And since it's elastic I don't have to worry about bumping it off.
The landing flaps were a bit tricky to add. I started with the smaller outer flap and once I had its position figured out I was able to use that as a guide for the larger inner flap. These parts don't exactly fit in place so you're going to have to carefully figure out how to glue these in place.
I added on the drop tanks, and I'm really happy that I went through that extra effort to drill out and build those red fuel caps. They look a lot nicer than before.
Now was finally the time to add on the wings. These fit onto the braces with quite a bit of wiggle room, which is great because the angle they rest at is kind of weird. The instructions weren't too helpful in getting the correct angle, but luckily there is a profile picture on the side of the box I was able to use as a reference.
The wings will flop around a bit so it's really important to add the braces that connect from the fuselage to the wing ( Parts B1) once these were glued this section was a lot stronger and I was able to move the model around without the thought that I might break off a wing from the hinge.
I painted the pilot with various acrylics from Formula P3, The Army Painter, and Citadel washes. I'm by no means a figure painter, but I'm really pleased with how this pilot looks and I'm excited to add him to the cockpit.
With the pilot comfortably seated, I glued the back section of the canopy to the fuselage. I think that there are some inaccuracies here as the canopy should be forward more, but then this gets in the way of the pilot. Sadly the white ceramic I painted that holds the antenna line is covered up, but everything is in place, and it's so fun to see these parts added.
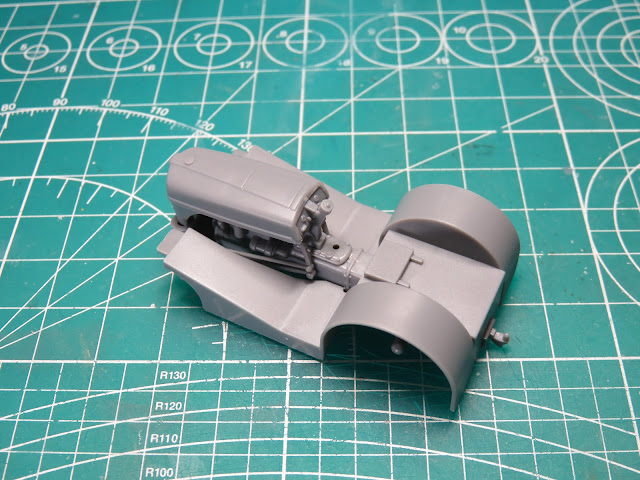
And now it's time to build the Moto-Tug. This little tractor is so much fun to build and for me was worth the price of the kit. There's not much to this build, and I began by gluing the engine halves together and placing that onto the lower chassis section.
I then added the front grill and sanded the joint smooth. I also added some smaller details like the steering wheel and shift lever.
The tug was then painted with Tamiya XF-66 Light Grey. I looked around and found that there were many different ways to paint these tugs, so I decided to paint it all light grey. After that, I painted on a gloss coat of Mr. Color 46 Clear for the decal application and panel wash.
I added decals to the back of the fenders, and then I was able to glue the driver to the tug. The kit also included 2 types of towing bars, one for pulling from the tail wheel, or one that splits connecting to the forward landing gear.
This is a really fun side project that was sadly only ever included with 2 kits. One was this Corsair and the other was the US Navy Pilots set that at the moment is out of production. It's a shame as I'd like to get that set and build another one of these tugs, but in an alternate scheme. Still this will look great next to the Corsair.
And with that, this kit is finally done! This was a really great kit to end the year building. Even with its age I still had a blast building this model, especially adding in all of the scratch built details. I have one more of these in the stash, and I think that one I'll build clean, I'd actually like to build one more after that, the 1A version to complete the Tamiya Corsair family.
There are a few shortcomings with this kit, fit issues, and details that aren't really accurate. It would be a great surprise if in the future Tamiya built an all new Corsair similar to their new tooled A6M Zero, and Spitfire Mk I. However I imagine the new Tamiya 1:32 Corsair kits have solved a lot of these issues.
When I built my first Tamiya Corsair the F4U-2 I was really interested to see how the folded wings worked. And I was really pleased with how fairly simple that process was. The new pilot is a great little addition to the model, as well as those menacing HVAR rockets, and I really love that Moto-Tug.
There are quite a few new Corsairs on the market these days and even a new one released this past month, but I still think that this model kit holds up after all of these years, so I'd encourage you to try one out and I hope that you have just as much fun as I did!
Until next time.


No comments:
Post a Comment