Monday, September 28, 2020

Moebius 1:1000 U.S.S. Kelvin

I remember all of the hype almost like it was yesterday for the all-new 2009 Star Trek movie. A huge budget and a new crew playing all the familiar characters we've come to love over the years. Admittedly when I first saw the film I actually enjoyed it, but one of the things that I've never really liked was the redesign of the Enterprise. It never really had the same heart as other versions of the ship, and the writers seem to get their jollies out of destroying the Enterprise in the sequels.

The one ship however that I absolutely loved was the USS Kelvin. This ship has a unique design, and it feels right at home to other ships in the Star Trek universe. I kept hoping for one of these, and besides a cast resin model, there were no other options available. That is until Moebius Models announced that they were coming out with 4 new ships from the Kelvin Timeline. They included the USS Franklin, USS Enterprise, Spocks "Jellyfish Ship" and to my delight the USS Kelvin.

Moebius began production with the USS Franklin in 1:350 scale. And the announced that next was the Kelvin. I had expected to see it in 1:1400 scale, but I was delighted again when they said 1:1000! This was great as that is the size of ships that I try and collect. I was excited to have it match all the other ships in my collection. 

The downside however was that once the kit was nearly completed and set for sales the company Moebius went under and was sold to Pegasus Hobbies. I had seen a few test samples of the kit online and there were a few for sale online. But because the company was under these commanded huge prices.

Thankfully and to my relief Pegasus Hobbies released the kit again, with stunning boxart and plenty on the market to go around. We have yet to get the other 2 kits from Moebius and at this point I'm doubtful that we ever will. But I decided that now was the time and I finally got my hands on one of my favourite ship designs.


The ship has phase cannons that can be placed in the squared sections, or doors to have them closed. Oddly enough the Kelvin class also has phaser banks.


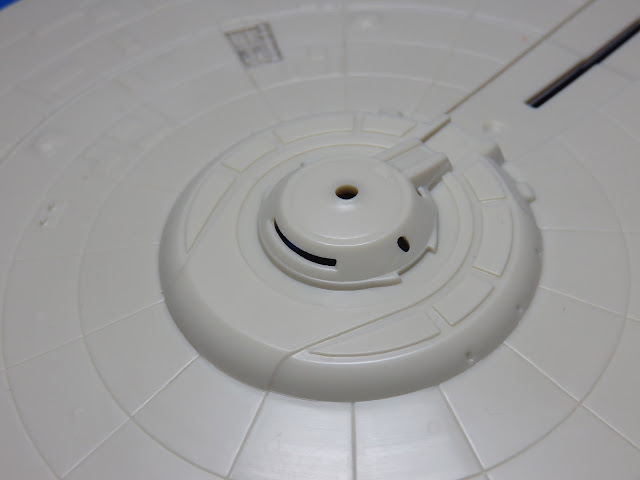
The bridge features several holes for a clear part to set in place.


One of the things, I was actually disappointed with was the size of this ship. I know that the Kelvin Era ships are bigger than other Trek series, and this was done on purpose, but here is it with the USS Excelsior placed on top. The Excelsior at it's time was supposed to be the biggest ship ever built, and to many points it still is. But as you can see here the Kelvin saucer section is slightly bigger than the Excelsior! ( AMT 1:1000 USS Excelsior)


Something I never noticed on the Kelvin was the damage on the right side of the upper saucer. There's an exposed square with some internal details, and many other squares to replicate damaged sections of the ship that were repaired in deep space.


A bit of panel wash to better showcase the exposed details.


The underside of the saucer has a nice thick frame to keep the parts straight and level.


The underside of the saucer features more square sections for phase cannons.


Parts of the neck and upper hull sections. These include an aft shuttle bay and a forward deflector dish.


There are windows detailed on this model as small squares. For those who are planning on lighting this model, it's not impossible to do but a lot of work and problem-solving. 


Here is the lower neck and HUGE warp engine. This engine alone is nearly as big and a 1:1000 NX class starship.


A break in the warp engines for some clear parts.


These bands run along the edge of the saucer section. They are for my kit the most disappointing part, as the details on them are fainter than the rest of the model. They will also need to be filled in and cleaned as I can see they will have larger gaps between them.


Phase Cannon doors closed, and bellow the Phase Cannons. Oddly enough there are no open doors for the Phase Cannons to sit in.


A rather interesting display stand is the dedication plaque for the Kelvin. 


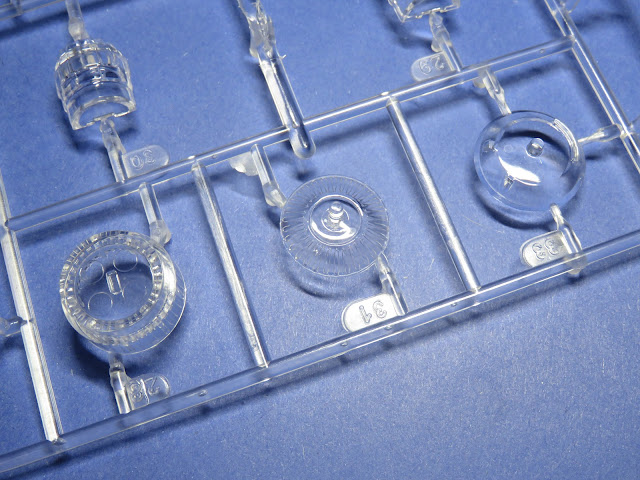
Quite a large section of clear parts for this build, plenty to light up should a modeler wish.


Part 27 is the shuttle bay doors, I'm not sure why this is clear?


You might be a bit confused with the decals as it looks like you get 2 of the same sets. Well, you sort of do. The top section of the decals is slightly damaged with little scuff marks. They look more like the wax paper got stuck and you lifted the decals. Bellow, they are clean and fresh, I find this to be a really nice addition by Moebius.


The instructions come in a nice book with a lot of descriptions for the stages and parts. Any beginner should have an easy time reading and assembling the kit. There is also a very nice full-colour paint and decal diagram with the real model kit used as a reference.


A rather interesting section of the model was the last pages of the instructions and this separate sheet demonstrating how you can create a multi-layered Aztec pattern on the model. I really like this addition for seasoned and new modelers to have a guide on how to create this really cool effect.


As the kit stands straight out of the box, I find this to be a really nice and fairly simple model. The details on the exterior are really quite nice and sharp, and I'm impressed with the comprehensive instruction guide. I'm pretty excited to get to work on this one, especially with creating all of the multi-panels of the aztecing. For beginners or seasoned modelers, I think that you will really fall in love with this kit. 

Monday, March 30, 2020

AK Interactive - WW2 US Army Air Force Colors RC5026

 I've seen ads for AK Interactive Paints and I've never tried them until now. There is only one shop close to me and they are quite pricey as a result. However, as of writing this post I'm building a Revell 1:72 B-17F Memphis Belle, and because the real Memphis Belle has been fully restored there is a lot of info on details of the aircraft. One mention was the Belle was painted with Olive Drab 41. And AK were one of the only companies that specifically make this paint.

Better still Olive Drab 41 comes in a boxed set with a underside Sky Grey, and Bright Green, for the splotches painted on the upper surface. All of this is perfect, and I managed to find the last box around for a while.


I've never used these paints before, but AK boast on their site that their paints are hardy and mix well with other thinners. I assumed that this boxed set was Acrylic, but the smell was awful and when I tried mixing with acrylic thinner the paint went grainy and mushy. So I cleaned out my airbrush and tried with Lacquer, and my did they paint put beautifully. Sadly no where on the box did they indicate that these were either lacquer or acrylics.


     Olive Drab 41 (RC259)               Neutral Grey 43 (RC261)                Medium Green 42 (RC260)


Neutral Grey 

Olive Drab 41

Medium Green 42


I have to say that AK really live up to their reputation of vibrant and lively colors. The pigments they use are very nice and bold. I do have some concerns about the Olive Drab 41 as it doesn't match the Memphis Belle and is quite a bit darker than I wanted. But it's a very sound and excellent looking Olive Drab.  In conclusion, I'm very pleased with the quality of these paints, and if I had easier access to them I'd be buying a lot more of these. They are easy to airbrush and clean and stick very firmly to the surface. I can see what all the AK fuss is about.

Friday, February 7, 2020

Hobby Craft 1:48 CF-105 Avro Arrow


I got a text from my sister, that my brother had found me an Avro Arrow...yeah right!  Then she showed me the picture he sent, and lo and behold a rare 1:48 Avro Arrow.

Not a lot of people outside of Canada will be aware of this aircraft or why it's important. I won't go into too much, but this aircraft and it's engines were 100% Canadian designed and built. It was going to be the new superstar of the aviation world and guard the north. Only 5 were ever built and testing on those was limited, when the aircraft and the entire production was scrapped and all everything was destroyed. No Arrows survive, only a few parts and plans that were taken from the factory and preserved.

So this is an important kit to Canadians, as a legacy to the engineering and dedication of all Canadians. Ever since 1959 Canadians still feel wounded that these majestic aircraft never took to the skies.

Hobby Craft or Hobby Craft Canada, had a good run back in the day. They produced several 109's in 48th scale that are still sought after today. They are most notable to Canadians for producing a CF-100 Canuck and CT-114 Tutour and of course Avro Arrow (all were made in 1:72 and 1:48 scales). From what I know based on someone who knew the original owner decided to retire and the company went to his sons. For some reason production halted, the several of the kits went to Academy as reboxings, and the beloved line of Canadian aircraft were lost. Only the Arrow in 1:72nd scale made an appearance again, but as a limited run. For years the HCC website promised that the 48th scale Arrow would return to the market, with retooled recessed panel lines and improvements. But sadly last year I noticed that the website vanished.

These kits aren't anything special in the way of Tamiya or Eduard, they need some work but they do build up into nice looking models. It's just a bitter shame that they are gone and no one seems to know where the tools are. Even though they were produced in Korea, they have yet to appear on the market under a new name. These kits are rare, in the sense that most modelers know these are important and very popular to Canadians, so a 1:48th scale Arrow can cost you $150 easily. Even though the kits really not worth that much, people know that Canadians really want these kits.

Enough talk lets look at this kit.  (This kit was bought used at a thrift store and as a result the window is missing, other than that the kit is complete)


The back of the box features a full color painting and decal guide. All the version RL-201 to RL-205 are present in the kit.


The main fuselage features recessed panel lines. Previous editions of the kit were molded in white plastic. This grey styrene is thin and quite grainy. I'll need to rescribe the entire model, and sand down the plastic to smooth out the grain.


The recessed panel details are really nice but rather thin, also featured are the dive brakes, but no interior detail for them.


The first sprue features the wheels and gear covers. There are no details for the inside (though there are aftermarket parts for these) Keeping in mind this kit was first made in 1987. The long piece at the top of the sprue is the spine, which also holds the tail in place.


Here on the sides of the intakes the grainy effects of the plastic can easily be seen. These aren't impossible to clean only a bit more work to make the kit more accurate.


Some of the engine details for the rear of the aircraft.


The landing gear is very simple compared to reality. The parts are quite sturdy however I'll be replacing these with resin and more accurate parts.


The Spine in more detail, showing more of the grail and lines, I assume was from retooling the molds. These lines are all over the kit.


Oddly the nozzles are really clean and have no grain, or much details to them.


Insides of the gear doors have minimal details and a few easily removed ejector pin marks.


The next sprue section features the nose, and a few of the interior cockpit sections as well as the Arrow's giant tail.


Panel lines are nicely done, however there are a few lines that aren't as tight as they ought to be.


The cockpit and details are minimal. There is an aftermarket set for this, but I'm not going to bother, as I plan on building this kit with the canopy closed up. So this detail won't really be seen.


Here are the head rests for the ejector seats. 


Again minimal details for the inside of the cockpit and forward wheel bays.


Here are the giant wings for this beast of an aircraft. I've read some people aren't pleased with the size shape and location of the blisters on the lower wing. They might be too big, but I don't find them to be an obnoxious inaccuracy.


A common feature on the aircraft and a big reason as to why I want to rescribe the model, as seen here these panel lines don't mate up with the other side.


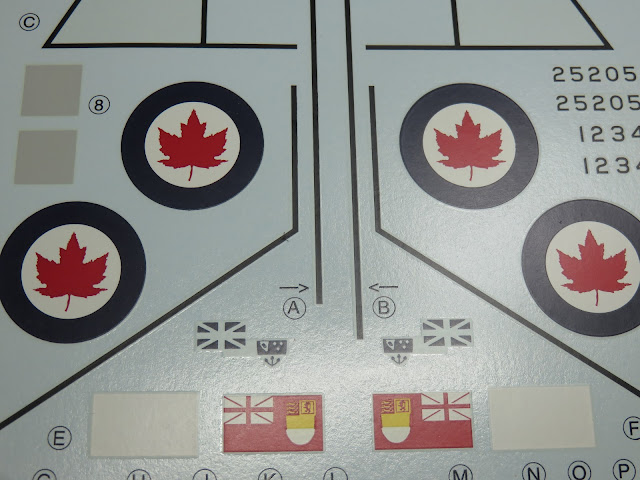
My biggest surprise is that the decal sheet is really quite nice. My only complaint are the the Red Ensign tail flags. They are printed in 3 sections and black in was used instead of blue. I was quite impressed with all of the instrument details for the cockpit that really won't be seen.


The roundels are quite nice, but not as crisp as I'd prefer, and the blue is a tad too dark. I'd like to replace these, so far the only company I know of is Canuck Models.com. But I never saw the Arrow decals in stock and I'm very sad to report that the company closed in late 2019. They were an excellent company.


I've taken pictures of the entire instruction guide. These aren't scans of the full instructions, but they are all there. So if any modeler buys this kit and the instructions are missing just copy these pictures for your own use.


I think a few things need to be mentioned. I don't want to come off as sounding harsh on this kit. It was made in 1987, it's over 30 years old. And for the lack of a lot of details, well the internet wasn't at the same capacity it is today. There wasn't a lot of detailed information on this aircraft so it's understandable as to why details are incorrect or missing.

I'm going to invest in a lot of parts for this kit. It's going to be an expensive endevour, but one that I gladly welcome. The only real obstacle for me is to find new decals for it. I might have to source them from several kits.

And even worse still... I need to find one more Arrow. I want to build one flying and one parked on the ground. But I'm so grateful that I at least have this one. I'm going to ask around to a few people and see whatever became of these kits and possibly find out where these molds are and if they might ever return. As I know there is a market for these older Canadian models.

It's a crying shame what happened to the real Arrow, and also sad that finding a model kit of it is a difficult task as well. And because it's so hard to find I'm determined to put my all into this kit to build it as best I can. Hopefully I'll be able to purchase the parts I need for it and start on it soon.