Sunday, October 29, 2023

Adding Wingtip Lights to your Models.


Adding clear wingtip lights to a model is a pretty simple and satisfying task. Granted, it does take some patience and at times a bit of trial and error to get it right. But once it's completed it will add a new level of detail to your model that you'll be smiling at every time you see it.

I've used the old Star Trek modelers method many times, apply a silver base coat, and then apply a clear paint, like Tamiya X-23 Clear Blue. This works really well, especially when the lights are difficult to get at, or you are working with a small scale. But with some patience, and some extra time, I think in the end you will be really pleased with these results.

For this demonstration, I'm using the Tamiya 1:48 F4U-1D Corsair. The wingtips are solid plastic and molded with the rest of the model.


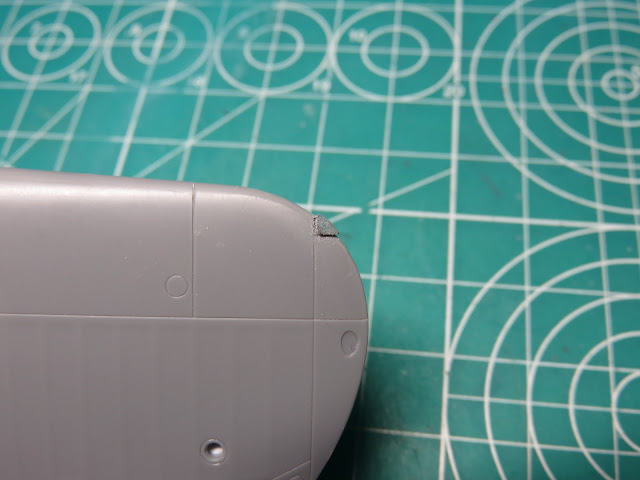
I began by cutting out the solid plastic. Then I took a square metal file and sanded away the plastic to create a proper 90-degree angle.


Next, I took the clear parts sprue from the kit, and with my Tamiya cutters, I cut off a small section of the frame. The good thing here is, if you make a mistake or you are not satisfied with the result there is plenty more material on the sprue to use.


Now I'm sanding down 2 sides of the clear frame, again at a 90-degree angle. This side will fit into the wing tip so it's important to get this angle as straight as possible. I'm using Vallejo Flexi-Sanders, as they are various grits, and make the work a lot easier. However, any sandpaper will do the job quite well. 


Depending on your subject you might want to omit this next step. Some aircraft used colored lenses on the wingtip, or like this Corsair, it was a clear lens with a colored light bulb inside.

To replicate this light bulb I used my smallest drill bit and drilled out a hole 1-2mm deep.  I also drilled the holes as close as I could to the center, too far forward and the hole would be exposed, this will be more apparent when we go further with the demonstration. 


I painted in the hole using Tamiya X-23 Clear Blue, and X-27 Clear Red on the other side. You can use solid colors like Flat Blue, but I think these clear paints stand out a bit more on the completed model. 

This is also an important step in the build as you need to keep in mind which color light goes on the particular wingtip.  Usually, the instructions will indicate what color to use, but a quick search online can usually turn up the proper results. 


I've painted the rest of the inside of the light with Tamiya XF-1 Flat Black, as this matches the wingtip of the Corsair. On other projects, I've used silver, and this helps the light bulb stand out a lot more as it's reflected by the silver. I'll admit I do regret not using silver on this model as the black kind of hides the light bulbs, but I wanted to keep it accurate to the real aircraft.


I glued the clear section into the wing using Mr. Hobby, Mr. Just Super Glue. The paint on the back should protect the clear parts from frosting over the plastic. I then left this glue alone for a few hours to properly cure and harden. I like the Mr. Just glue a lot as it's very strong and dries quite quickly.


Using a 400 grit, I slowly sanded away at the clear plastic gradually shaping to the wing profile. However, at this stage, don't sand the clear so that it's flush with the wing. Just sand away enough so that you have a close profile.

Try not to sand too aggressively, as you can still pop the clear part off of the model. 


This is what your first sanding should look like. Next, we'll sand down the profile with a finer grit. This way you don't have to clear up the sanding scratches on the rest of the model from the 400 grit.


I'll begin by using 600 grit to sand down and get the profile of the light. Once I'm satisfied with the profile, I'll move on to 1000 grit to get a nicer polish out of the clear plastic.


Here is the wingtip with the sanding completed. It looks pretty good right now, and seeing that tiny blue light bulb is really cool. We're not quite done yet, lastly, we'll get rid of all of those tiny scratches and greyish plastic.


To restore the clear parts simply take a gloss paint, in this case, I'm using Tamiya X-22 Clear, and paint it over the clear parts. Almost instantly the parts will be restored to a crystal-clear shine. This is also a stage where you might instead want to paint a clear blue, red, or green depending on your subject.

I would also note that this step is one of the last things I do when I'm completing the model usually after I've added a final flat coat. I'll usually cover the wingtip lights with tape or use a masking agent. 


And there you have it, nice shiny wingtip lights ready for your next project. A lot of modern kits these days will include clear parts for the wingtips but for other kits, this is a really fun way to add just a bit more detail to your project. 

I've tried this method on a variety of scales, and it usually depends on the subject, but I find it's not that noticeable in smaller scales. 1:48, and 1:32nd scale subjects will really stand out. 

I'm going to continue with my Corsair build, and I now can't wait to have it completed and see these clear lights.  This process might have been fussy dealing with tiny parts, but I know in the end I'll appreciate these efforts on the finished model.

Friday, October 20, 2023

Tamiya 1:48 F4U-1D Corsair with Moto-Tug - Part 2

 I was very fortunate while doing some research on this subject, to find an actual picture of 69 taking off of the USS Franklin. This picture is invaluable at the moment as it shows that most of the gloss is gone from flying and that this Corsair was a lot more beat up than I had expected. I initially thought that this was going to be a clean and glossy, or at least semi-gloss finish as is depicted on the box art. 


This is going to be a more fun and involved project as I can now plan for stages of weathering. One thing that really stood out to me was the pilot's headrest. It's a lot bigger than what is included with the Tamiya kit, and it sticks out quite a bit. I decided that I would replace this and sculpt a whole new headrest, this would be tricky as I already had the cockpit installed into the fuselage.


I used Vallejo sanding blocks (400 Grit) and carefully sanded away the old headrest. This was a slow process as I didn't want to damage any of the lower details, and I didn't want to accidentally sand away too much.


I started with a block of styrene, and using Tamiya tape I made a small template in the size and shape of the headrest. This is similar to what I did when I made the new throttle controls. I then super glued this piece to the back of some tape so that I could handle it while I sculpting, and so that I didn't lose the part.


Next, I mixed up a small pea-sized batch of Milliput, a 2-part sculpting epoxy. I placed this over the styrene and carefully cut away the excess Milliput until I was left with this shape.


I wanted to add a thin line around the headrest that would replicate the 2 sections where the leather was stitched together. I've tried sculpting parts in the past and I've had trouble with the Milliput sticking to my tools. I watched an interview with the Perry brothers, famous miniature gaming sculptors who own and operate Perry Miniatures.

They were asked by the interviewer how to stop the tools from sticking, and their advice was to use some hand lotion and apply a little bit to the end of the sculpting tool. This is one of those things that is so simple I wonder why I've never thought of it. And I can tell you from first-hand experience that this works, really well! I used my hobby knife and a #11 blade to carefully cut the thin edge that I wanted. 


Lastly, I used a sculpting tool from The Army Painted to create a few creases in the center. I then left the Milliput to dry for several days before I removed the headrest from the tape and carefully sanded down and evened the edges. 


I repainted the cockpit green, and then I painted the headrest XF-1 Flat Black, and then used Tamiya Panel Line Accent Color Grey to highlight the recessed areas. Once this had all dried it was a simple process of gluing the headrest back into the cockpit and adding a flat coat to blend everything back together.

This was a challenging process, but I everytime I try sculpting I find it to be a lot of fun. And I really like how this new headrest looks inside the cockpit.


This kit includes open and closed cowl flaps, unfortunately, these are a bit rough on the inside and don't have any details. I decided that it could be a fun task to add some more details to this section. I started by sanding the inside as there are a few marks in there and I'll need this space smooth for the styrene blocks that I'd be adding.

I added these blocks to all of the wider cowl flaps and drilled a small hole in the center. There are a lot of details on the real Corsair and because of the small scale, I'll only be adding as much as I can build.


I then glued small triangles to each of the blocks, these were difficult to fix in place, so I used Mr. Cement SP to fuse the parts together.


I filled in the remaining cowl flaps with smaller bits of styrene. Then I added longer plates to the ends of each of the triangles, these would be trimmed down once the glue dried, they were a lot easier to glue in at this size. This is where the springs would go that keep the cowl flaps open.


To create the springs, I took my pin vise and tightened a pin into the chuck. I then used some 0.2mm wire and slowly wrapped it around the pin to create the tiny springs. Once the wire was tightly wound up, I measured every 3 lengths and cut the spring into small sections. 


These small springs were then super glued onto the tabs all around the cowling. I was sure to make some extras as I did lose a few springs in the process. I also cut a small V-shaped grove into the triangles for the center wire that runs around and closes the cowl flaps. 

I've test-fitted this part a few times to the fuselage and it looks really impressive. It might not look like too much at the moment, but once it's primed, painted, and given a wash these little details are really going to stand out.


When I was scribing some of the details on the top of the fuselage I realized that I had sanded away the fuel cap. This is a part I really wanted to add back to the model. However, I don't really have any good scribing tools to carve out a circle, as you can see from my first attempt.

So I decided that I'd rebuild the fuel cap, by first drilling out the center portion.


I then glued some styrene to the inside of the fuel tank. This was going to be the new base for the fuel cap.


Using a leather punch I was able to punch out some disks out of styrene that were approximately the same size as the hole. 


The fuel caps on the Corsair have a small raised handle, I replicated this as a very thin piece of styrene. It was very tricky to get it glued to the cap, but I did manage it in the end. 

I'm glad that I decided to add these parts to the model. I'm really excited to paint the fuel cap red and see it stand out against the overall blue finish. As well, the headrest is going to look great with the seated pilot. 

There is still a lot of work to be done, and I think I'm finally ready to begin working on the wings.

To be continued...


Tamiya 1:48 F4U-1D Corsair with Moto-Tug - Part 1

 I've recently finished my longest project, lasting over 5 months. I've got to admit the project while fun and rewarding was also exhausting, and so I was looking for something fairly easy to build. 

I built the Tamiya 1:48 Bird Cage Corsair a few years ago and I had a lot of fun building that one. I've wanted to build another, but to build it with the wings folded. Plus the inclusion of this Moto-Tug, I couldn't resist picking up this model.


Tamiya released 4 different Corsair models (not including the motorized F4U-1A, which is basically the same as the standard kit). This version of the model was the last to be released and featured a new sprue with wing rockets, and a new pilot looking back. It features 3 markings from the USS Franklin, USS Hancock, and USS Wasp.

This kit was first released in 2002 and is now 21 years old, and it's still a really great kit. I'm going to make some modifications to this model, especially in the cockpit since the canopy will be posed open.


My first step is to add some extra wires beneath each of these side boxes. I drilled small holes just deep enough for the wires to sit but was careful that I didn't drill through the side wall.


I used 0.2mm magnet wire and super glued these into the openings. 


After the glue had dried I bent the wires forward, the extra wire would be hidden behind the instrument panel.


The throttle section is pretty flat to the side of the interior. On the real Corsair, this section is quite large and stands out quite a bit. Plus a few of the controls are missing.


I took some tape and placed it over the throttle. Then I took a Gundam marker and carefully traced the outline I needed. I then cut out the tape using the inner oval section of tape as a guide.


I stacked several small pieces of spare Evergreen Styrene I had laying around my desk. Once these were glued together I placed the tape on top and carefully sanded the excess plastic away until I had the correct shape.


It took me two tries to get this small piece built up properly, but I'm really pleased with this result. It looks a lot better than before, and now I can add the new levers.


I made the handles out of some very thin and flexible styrene. I then took canopy glue and dabbed it to the ends of the handles. This dab of glue would dry into a nice sphere. It's hard to see it in this picture as the glue is clear, but once it's painted it will compliment the rest of the interior. 

I also found a picture of a -1A Corsair that had a small placard panel. I have a set of Mike Grant 1:48 Cockpit Detail decals, and included in the set are random placards, I thought this would be a nice extra detail to add.


I painted the cockpit with Mr. Color 351 Zinc- Chromate. The wires were then painted white. I also like to paint the buttons with a dark grey, this helps them stand out from the rest of the panel.


I painted the throttle section Tamiya XF-1 Flat Black, and Mr. Color 8 Silver for the handles. Now that there is paint added it's a lot easier to see the ends that were made out of the canopy glue. After all of the interior details were painted I sprayed a coat of Mr. Color 46 Clear to seal in and protect the paint for the washes I'd be adding next.


For the black side consoles and front instrument panel, I applied Tamiya Panel Line Accent Color Grey. This will break up the monotony of all black and help the small details pop out against the darker surfaces.


I applied Tamiya Panel Line Accent Color Dark Brown to the green sections. These Tamiya washes are enamel based, and can easily be applied over Acrylic and Lacquer based paint. I usually leave these washes to dry for about 24 hours as they are easier to manipulate once they have really dried out. 


Removing the excess wash is easy with Tamiya Enamel Thinner (the blue cap). I'll normally use a cotton bud dipped in the thinner to remove the excess paint, but in this case I used a stiff brush and slowly dabbed away at the paint. This is a late war Corsair, so I didn't add any chipping, and I wanted to keep it fairly clean and not really dirty like some of the land based Corsairs. Most of the panel wash was kept around the raised details, this will also help highlight these details once the pilot is installed.


I sprayed the parts with Mr. Color 182 Flat Clear, and then I was able to assemble the parts. I really love how those brown and grey washes really show off the details. The cockpit sections were then fitted into the side of the fuselage, beginning with the rear section, and then carefully fitting in the section with the instrument panel and control column.


I'm really glad I went through and built those new throttle controls, as it's a lot more accurate looking. Next, I'll glue the fuselage halves together and then I can begin adding more details to the engine.

To be continued...