Tuesday, April 30, 2024

MPC 1:72 Millennium Falcon / Stellar Envoy (Part 11)

 When I decided to build the Millennium Falcon as the Stellar Envoy I was left with the opportunity to add new characters to the cockpit section. I really liked this idea as it would give me the chance to sculpt a fun alien from the Star Wars universe. 

And thankfully because the Star Wars universe is so vast there are a lot of different aliens to choose from. I decided I'd try sculpting a Gran, the 3 eyed aliens that were first seen in Return of the Jedi. I've always thought that these were fun-looking creatures and that one would make a nice addition to the model.


I began by raiding my spare figures box looking for any pilot figures that I thought would look appropriate. I found this one from an old Matchbox model kit. I then used my Tamiya Sprue cutters to quickly cut the head off of this figure. 

I'm also using an old paint pot that was included with a very vintage Matchbox Model kit. One day I put some plasticine on top and ever since these paint pots have been my small parts holders. The best part is that the paints are still fresh so they are heavy and aren't easily tipped over.


Next, I mixed some Milliput 2-part Sculpting Clay. Milliput is really nice as it is very easy to work with, and it air dries to a rock-hard finish. There are many varieties of Milliput to choose from, and for this project, I'm using their Standard version. 

This clay comes in 2 colors, Yellow is the sculpting clay, and Grey is the hardener. I mixed these two together for about a minute, wetting my fingers with a bit of water when it got too sticky. When you mix the 2 together enough it should be fairly smooth.


Using mainly my hobby knife and a cocktail stick I was able to sculpt a small head and carve out a pointed mouth. Then I created the 3 eyes and fit them to the top of the face, and lastly, I flattened some Milliput to form the ears on the sides. 

At this point, it looks more like a 3 eyed space cow than a Gran, but later on, I'll pass this figure to my brother who is an award winning figurine painter and it will look a lot better.

Unfortunately, I got so carried away with the sculpting that I forgot to photograph more of the sculpting process.


Later on, I had the idea that I should have sculpted one of the typical Grey aliens that apparently are out abducting everyone. And then I remembered that something similar already existed in Star Wars, an alien race called Duros.

To create my Duros pilot I cut the head off of a very, very old Revell pilot. And again I mixed up some Milliput and formed it into an egg shape, with a pointed chin and more bulbous head.

I took my hobby knife and I carved out some lines on the face where the Milliput would need to be carved out.


I carved out the Milliput where his eyes would eventually go. And formed a brow on the top of his head. This was done using the spoon side of my Tamiya Paint Stirrer, which worked incredibly well at smoothing out the Milliput. 

I also carved out a small mouth for him using my hobby knife. So far I think this one is looking really great.


With some difficulty I used extra Milliput I had discarded and rounded the putty into two small eyes for the Duros. I carefully stabbed these with my hobby knife and gently placed them on the head. I then dipped a paintbrush into some water and slowly brushed the eyes in place. 

I also used my knife to cut away the sides of his head to make it a bit more squared like the Duros featured in the series.  

This sculpting was really fun and I had a much better time with the Duros than I did with the Gran. I find Milliput to be very easy to use and it encourages me to try sculpting more with future projects. The next time you are in the hobby shop pick up a box of Milliput and give sculpting a try. Even if it's adding some fuzzy dice to hang on the mirror, or a parachute for the seat of your aircraft, I think you'll have a lot of fun sculpting a new detail for your model.


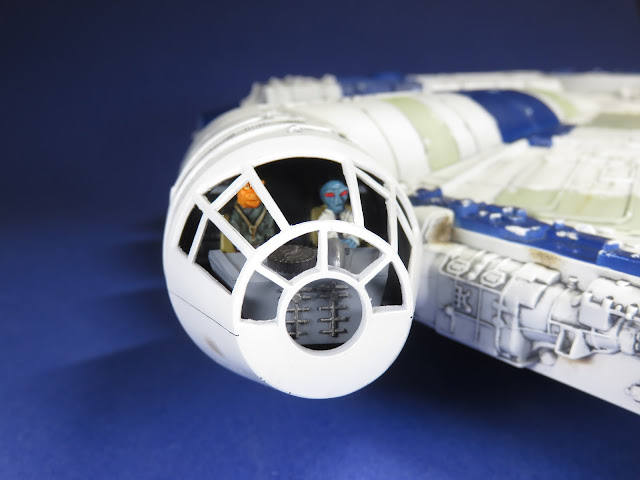
As I mentioned earlier I handed off these figures to my brother to be painted, and he didn't disappoint! He used various acrylics to paint these figures, for the flesh tone on the Gran he started with Army Painter Elven Flesh. Followed by adding a wash of Citadel Fuegan Orange which brilliantly brought out all of the details.


For the Duros pilot, the flesh tone was painted with Army Painter Griffon Blue and gently dry brushed with a light grey to highlight the details. The eyes were painted with Vallejo Vermillion (70.909) which is really bright and bold and stands out on the figure. 

Lastly, for the jacket Army Painter Gorgon Hide was painted, and given a wash of Citadel Soulblight Grey.  

I'm really impressed with how beautifully he painted these figures, and in 1:72nd scale as well. 


I couldn't wait, as soon as I took the previous pictures I had to glue these figures to their seats to see what it would look like. And I wasn't disappointed, these odd-looking aliens are perfect for adding more to the story of the Stellar Envoy, whatever that might be. 

And I find it sort of funny that I've had these figures in my stash since I was an early teen, thinking that I'd never use them. And then I get a project like this, and all of sudden they are the perfect parts and they are transformed into aliens. I guess that's just part of the male mentality to hold onto things, that someday they will eventually be used.


It took a bit of fidgeting but I was able to get the cockpit section placed into the tunnel. I used some Mr. Just Super Glue to attach the bottom of the floor to the tunnel.

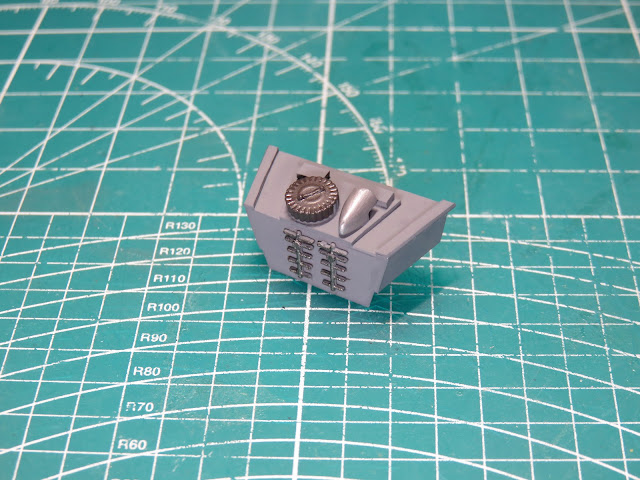
I had mentioned in one of my earlier posts, that it was a shame that Round 2 created these fantastic new figures of Han Solo and Chewbacca, but not the front console. When I test-fitted the canopy cone, the front just felt too bare. So I decided the only thing to do was to build one myself. 


I used scrap pieces of Evergreen styrene, and I built a center leg piece, and then an angled flat top was glued. I would then add more styrene to the front and sides of the console. For a size I kept this console fairly low, close to the alien's waists. I didn't want this to be too tall and distract from the figures.


I added some more styrene to the top of the console, and then I searched through my spare parts box to see what I could find that looked interesting.

I added some antenna to the front of the console, and an intake to the right side. I wanted to add one of these ammunition canisters when I was building the canons but I never found a good place for them, so I got to add one here.


I airbrushed the console with Tamiya XF-53 Neutral Grey. When the paint had dried I hand-painted a few of the smaller details. The antenna was painted with Tamiya XF-56 Metallic Grey. The intake was painted with Tamiya LP-11 Silver, and XF-84 Burnt Iron was painted onto the ammunition canister.


And here I've glued the console onto the cockpit floor. This was a pretty simple build, but it really helps to fill out and busy the rest of the cockpit. 


Lastly, I added the nose cone canopy to the Stellar Envoy with Mr. Cement SP.  You might have noticed that I didn't add the clear part to the canopy first. This was because of the extra frames that I added to correct the cockpit frame. Unfortunately, the clear parts were pushing against these frames, and I was concerned that they might break and ruin the paint.

So much like the original studio model of the Millennium Falcon, I decided it would be better for me to leave this part off. 


And that will do it for this post. The cockpit section is all completed and there's not much more left now. I had hoped that I would have this all done for May 4th this weekend, but I think that the next post will be the final one. 

In the next post, I'm going to try and build a simple and effective display stand for the Stellar Envoy and then add on the last parts.

It was a lot of fun to create these aliens, and to build that console, the Envoy looks a lot better now. I get nervous every time I decide to try sculpting, but every time I end up having fun trying something new. And maybe next time I'll get my brother to teach me how to paint figures and learn a new skill.

To be concluded...


Monday, April 22, 2024

MPC 1:72 Millennium Falcon / Stellar Envoy (Part 10)

I'll admit something to you, I'm not that big a fan of weathering models. Now please don't confuse this to mean I don't like weathered models, because I in fact do. But in my own personal models, I sometimes find it difficult to draw that fine line between just enough, and too much. 

There are times when I'm building a subject and I think that the weathering is going to look really great and then once it's done I might realize I've gone too far and it's too late to take it back. This is one of the reasons I like to use oil paints, or enamel when I'm weathering, if I don't like it I can remove it and try again or get rid of it together.

In this post, I'm going to add some more weathering, and it's going to be a lot of fun!


These are Tamiya Weathering Master sets. There are a variety of these to choose from and even a few rarer limited editions. But they are excellent for weathering, and best of all, if you don't like it you can easily remove them by rubbing them off with a soft eraser, or a cotton swab dipped in water. 

So if you don't like the weathering or you just want to try it again, these Weathering Master sets are very easy to use. Inside they come with a rubber-tipped applicator/brush. Personally, I prefer these smaller makeup brushes, as they last a lot longer and are very inexpensive.

I've also cut down an older paintbrush so that just a few millimetres are remaining. This stubby brush is really useful for applying the pigments.


My sister jokingly calls these my Tamiya Make Up kits, and opening these sets up I can't help but laugh and agree with her. Inside you'll find 3 different pigments. 

I'm using my tiny brush to collect some of the pigments. Don't press the brush into the pigments, this will cause everything to break up. Just a few gentle passes are all you need to collect enough of the pigments for the model.


I wanted to create some carbon scoring or dirt debris around the ship. I'm brushing Mud from Tamiya Weathering Master Set A into a small oval pushing the pigments into the paint. 

When I'm done adding the pigments I simply blow off the excess.


And here is the finished result. I'll be adding more scuffs like this around the rest of the model, but you can see how quick and nice this effect is. No airbrush was needed, and as I mentioned before, if you're not satisfied with the effect it's easy to remove with some water on a cotton swab or a soft eraser.

You can also try adding layers of pigments on top of each other for a unique effect. This works really well if you are painting on something like exhaust streaks on an aircraft, car, or tank. 


On the studio model of the Millennium Falcon, there are many areas where "space rust" is present. It's one of those things that once you notice it, it's pretty hard to ignore it. I added some to the insides of the exposed bays. And I think that it looks pretty good in there adding a bit of color to these sections. I used Rust from set B to create these effects.


Lastly, I wanted to add some streak effects to the front of the mandibles. I've done this same effect on a few X-wings in the past and I think it looks great. I placed some hobby tape along the raised edge of the mandible, and then I brushed more Mud pigment starting on the tape and brushing backwards onto the model. 

I brushed on the pigment in a few passes to darken the effect some more. 


Once I was finished I removed the tape and this revealed the streaks.  I really like this effect, and you can even use this on the rest of the hull to create streaking instead of using enamel or oil paints. 

I tend to apply this a bit more on the heavy side, as there have been a few times when I've added too strong of a flat coat and these details end up vanishing. 

These pigments are pretty sturdy, but they are vulnerable to fingerprints. So use care when you are handling your model until you can add a proper protective coat.


This next stage was going to be a lot of fun and that was adding the smoke streaks on the rear vents. To create the streaking effects I'm going to be using some Tamiya Panel Line Accent Colors with a few drops loaded into my airbrush.

I've used this effect on aircraft to create exhaust stains running down the fuselage. It's a very nice effect but I will warn you that these paints are painted on very thin and they are very easy to rub off if you aren't careful.

To start I used Tamiya Panel Line Accent Color - Black- and I sprayed this into the center of each of the vents. Once I had sprayed enough color to where I felt it was dark enough I then made quick passes spraying the paint down the hull to create thin streaks.

I have to spray quickly with this as my airbrush compressor sadly doesn't have sufficient airflow power for me to lower the pressure.  I hope to get myself a new compressor soon, one that I can lower the pressure on and still have the airflow I need to make these streaks tinier. But for now, quick passes will have to do, and they are looking really good so far.


To brighten up the colors a bit and have the streaks be more visible, I added some Tamiya Panel Line Accent Color -Grey- to my airbrush.  I positioned my airbrush really close and I sprayed the Grey paint into the middle of the Black as best as I could. 

The grey paint layered onto the black will help the streaks to stand out a bit more and add more variety in the colors.

You can try adding other colors to your own models. I chose only a few colors for this particular project, but other times I like to add something like Dark Brown and Light Grey and layer these together.

And best of all, if you aren't satisfied with the effect you can take some Enamel Thinner and rub it all off and try again.


When I stood back and looked at the streaks I decided it still needed one more color. I added a few drops of Tamiya Panel Line Accent Color -Brown- into my airbrush, and I sprayed a few small splotches onto the vents.

They are a bit difficult to see in this picture, but the few drops of "space rust" really brought everything together with this side of the model. 


With all of the weathering now completed, I added a flat coat to seal and protect the paints. My go-to flat coat is Mr. Color 182 Flat Clear. I've had a lot of great success with this paint, since it's a Lacquer it dries to a hard finish and it dries pretty fast so I can continue with my work.

It does need to be stirred up very thoroughly, and I mix it with Mr. Color Levelling Thinner about 50-50. After I sprayed the model with the Flat Clear I left the Stellar Envoy alone to dry for about 12 hours, just to make sure the Flat Clear had hardened all the way through. 


I think that I've added enough weathering to the Envoy, at least to a point I'm happy with. Like I mentioned at the beginning of this post, I usually worry that I've gone too far and it will end up looking like a mess. But here the Stellar envoy looks like a well-used spaceship. 

I always find it amazing how adding a Flat Coat can really change the model. After all the time with it being glossy, it will take me a bit to get used to it seeing all of the colors uniformed together.

As I step back from this project and look at what else there is to do, I'm surprised that I actually don't have a lot more left to work on until this model is completed. That is very exciting, and in the next post, I'm going to be doing some sculpting and even bring in my brother to help me with some difficult painting (difficult for me that is, he makes it look easy), until next time.

To be continued... 


Monday, April 15, 2024

MPC 1:72 Millennium Falcon / Stellar Envoy (Part 9)

 I've received a lot of disgruntled comments over the past few years about adding panel washes to models. Many claim that real aircraft don't have their panel lines painted in and therefore the model shouldn't either. 

I think this is a rather juvenile comment to make. No, panel lines aren't painted in per se, but they do catch a lot of dirt and debris. On a model, however, it's a great way to accent details and help these details stand out on a smaller scale. 

As for accuracy, well, we're building a fictional spaceship, this doesn't have to be accurate. But it does need to be a lot of fun and that's exactly what I intend to do, so let's start weathering!


As I mentioned in Part 8 I would be glossing over the newly painted areas. This would help the flow of the enamel paint as well as help me to remove the excess paint. I painted Tamiya XF-8 Flat Blue onto this spoon and painted half of it with Mr. Color 46 Clear Gloss.

I've taken some Tamiya Panel Line Accent Color -Black- and painted a line across both sides.


I removed the wash with Tamiya Enamel thinner. Because the Mr. Color Gloss was a smoother paint I was able to easily remove all of the wash from the Left side. On the Right side without the Gloss, you can see a faint black stain that has been left over from the wash.

Also when I was removing the wash from the right side I began rubbing off some of the blue paint because it wasn't protected. So you don't need to apply a gloss coat, but it does help a lot.

For a gloss coat, I like to use Mr. Color 46 Clear. It's a Lacquer paint so it dries really hard, and it won't leave fingerprints. One of the nice features of Mr. Color and Aqueous paints is that they are usually Gloss or Semi-Gloss paints, so there are times like with the Insignia White when I don't need to add a gloss coat. Mr. Color usually prints on the front left side of the label what type of gloss the paint is.


There are a lot of enamel washes on the market these days. I've invested in quite a few of the Tamiya Panel Line Accent colors, and AK Interactive has a wide range as well. But what do you do if no one makes the exact wash you're looking for? Well, I'm going to make my own, and it's easy to do. 

Over the past few years, Tamiya Enamels have slowly become more common in North America. When I was a kid I used to paint all of my models with Testors, and Humbrol paints. And I wish that Tamiya Enamels had been around as these paints are incredibly nice to use.


I added a few drops of XF-63 German Grey into my mixing pot. And then I thinned it down with Tamiya X-20 Enamel Thinner.  I don't have an exact ratio for this mixture, but it needs to be thinned down enough that it can easily flow over the details. 

If it's too thin and the paint comes out grainy, add a drop or two of XF-63 and stir up the wash again.


When the wash is properly mixed it should flow easily around the details. Here you can see the German Grey being painted on, and how the wash will highlight the raised parts like these squares and pipes. As well it falls into all of the recessed panels to feature these details.

This is one of my favourite parts of modeling as I really love watching the paint flow along all of the parts. What makes it even more fun compared to subjects like aircraft, cars, or tanks, is that sci-fi subjects usually have a lot of greeblies detail that I can paint over.


I painted a very liberal amount of the German Grey into the recessed exposed sections as I wanted these areas to be a lot dirtier than the rest of the ship. 


I've been looking forward to this moment ever since I started this project, and that was adding the wash over these aft vent details. This was really satisfying to see all of these tiny lines filled in with paint.  I'll be painting some more details to this section later, but for now, this was a lot of fun.


What a mess! I've finished adding the wash to the upper side, and now I'm going to leave the paint alone to dry for about 24 hours. This will be enough time for the paint to properly dry and then it will be easier for me to remove the excess paint from the model.


Now that 24 hours have passed I can remove the excess paint with a cotton bud that I've dipped into the Tamiya Enamel Thinner. It's very easy to remove the paint, I rub it over with the damp cotton bud, and then with the dry side, I can further wipe away any lingering paint.


Here is the cleaned-up panel section. You can really appreciate all of the piping and other details with that thin line of paint around them. Because of the size of this model and a lot of the small details, this will take me a good while to clean up.  I think on the topside alone it took me almost 2 hours to complete. But it's time well spent as you see all of the details emerge.


To add further streaks and grime to the model, I pulled out a few more Tamiya Enamel paints. I placed a small drop into my paint bowl and added a bit of Enamel thinner to the other side. This way I could quickly thin down the paint.


I painted these various streaks along the tops of the panels and at the base of some of the square details. Because I had slightly thinned the paints I didn't need to wait too long for these paints to dry. I don't know what exactly would cause all of these streaking effects to happen on a spaceship, but they are present on the studio model of the Millennium Falcon and they look good there so I added them to the Stellar Envoy as well.


Using a wide flat brush I dipped it into the Enamel Thinner just enough so that it was damp. I then slowly brushed it down the paint, pulling it and creating these streaks. It was a slow process and there were a few times when I completely removed all of the paint and had to try again, but this is the end effect and I'm pretty pleased with the results. 


And this is where I'll wrap things up for this week. I'm really pleased with the streaking effects that are on the hull, and I think I might wait a day or so and decide if I want to add some more. They look good, but it is easy to go overboard and I don't want the Stellar Envoy to be as dirty as the Millennium Falcon. 

I want to add some more dirt details to the model, some scuff marks as well as some smoke coming from the back of the vents. 

This is one of the reasons why I have so much fun building sci-fi subjects is that you are freer to go overboard with these details, and just let your imagination loose for a while.

To be continued...


MPC 1:72 Millennium Falcon / Stellar Envoy (Part 8)

 I've been trying to think of a time when I used this much tape on a single project. I know that I used quite a bit when I built a 1:72nd U-boat, but in all honesty, I think that this project will hold my personal record for the most tape used.

What made masking more difficult with this particular project was all of the indents that were cut into each of the raised panels. These are quite pronounced which is just part of the fashion of this vintage model.

Though the work might not look the most productive, I can assure you that all this extra time, tape, and patience really pays off for the overall look of this model. Let's get into it!


One of the first things that I did was cut a bunch of tiny strips of tape that I could push into each of the notches. This was time-consuming as all of the notches were different sizes, but in the end, it would add to the effect of the painted panel. 


With most of the panels, masking was easy, however, because this panel was right next to the opened bay I once again stuffed it with Silly Putty.  This saved me a lot of time and tape that I would have used to fill in the section.


I chose a few panels on the top section and I painted these with Tamiya XF-19 Sky Grey. Similarly to the Millennium Falcon, I decided to add a bit of extra color in the form of painted panels. I was careful to not choose too dark of colors so that they would overshadow the blue sections, and that would further compliment the Insignia White. I found Sky Grey to be an excellent paint to use and in keeping with the theme of the prequel era color pallet. 


While I was painting the Sky Grey onto the upper side of the Envoy I found a lot of the panels that I wanted to paint were already, or mostly covered by the flat blue. 

So when I flipped over the model to begin painting on the underside I decided to paint the Sky Grey panels first. I did refer to the Hasbro toy briefly before I realized Hasbro basically invented all new panels. So I decided to just pick out a few that I liked the best.

I'm really pleased with this result, and I'm hoping to find some sort of way to display this model so that the work on the underside will be appreciated. 


I was really enjoying the look of the XF-19, but I thought that it still needed a bit more color, a slightly lighter grey would look the part. I decided to use Tamiya XF-14 J.A. Gray, mixed 50-50 with some XF-2 Flat White. 

The J.A. Green has a nice green tint that doesn't distract from the Insignia White. As before with the Flat Blue, I sponged on some Mr. Hobby, Mr. Masking Sol NEO to create chipping. 

The model is looking busier now, but in a good way, as these colors aren't too dominant or distracting from the rest of the model. And the lightened XF-14 looks like a great Star Wars color that I'm sure you'd find on the Millennium Falcon.


I couldn't find any references of the underside of the F-Toys Stellar Envoy, thankfully, I found a few of the Hasbro toy. And the blue sections are really minimal compared to the top, with the blue just covering the outer edges. 

This wasn't the most difficult masking but it did take some time to properly cover everything. And just like before I sponged on Masking Sol NEO to create the chipping before I painted these areas with Tamiya XF-8 Flat Blue.


And here is the completed underside of the Envoy. I'm really pleased with the different grey panel colors, and the blue running along the outer edge of the ship. All of the masking was a lot of work, and some of the panels I chose were very difficult, but in the end, I think it's worth that effort to help add a bit more character to a model.

You can also see that a few of the grey panels lead to the outer edges, and these would be covered with the Flat Blue, but when you look closely you can still see the grey paint in the chipping. This is a unique effect and something I wish I had realized sooner when I was working on the topside. 


Moving back to the top surface I needed to paint what will likely be my last hull color, a few red panels and this strange symbol that is painted next to the dish.  I looked online to see if this symbol was something in Aurebesh the made up Star Wars language, but I couldn't find anything, so for now it's just a cool symbol.

I decided to first draw out this symbol on paper and try to draw it to an appropriate scale. Once I was satisfied with my drawing I cut it out and placed it on some wide masking tape, so that I could cut out a painting mask.


Taking a brand new hobby knife I carefully cut out the stencil from a piece of glass I got from my Dad's shop. Hasbro has this symbol more curved, but I liked the angles featured on F-Toys. These straight angles also made it easier to cut out as I just had to keep the knife as straight as possible.

When I'm cutting tape, I like to use this small piece of glass. It makes it easy for me to handle and view the tape as I'm working, and it's very easy to cut into without dulling the blade. Also, it's easier for me to remove the tape versus using something like my cutting mat. And lastly, the glass won't steal all of the tack from the tape so I can ensure a firm grip once it's placed on the surface of the model.

This piece of glass is also where I was able to cut all of those tiny rectangles that I used to fill in the notches of the panels.


I took the negative from the stencil and gently placed it onto the model. This would act as my placement guide for the positive stencil. By using the negative I could reposition the stencil and find a correct/appropriate place without damaging the positive.


Now that I was satisfied with the placement, I laid down the positive stencil and removed the negative. Unfortunately, this section has a lot of bumps and grooves, so I'm going to press the tape down firmly. As before with the Flat Blue I'm going to try and fill in the gaps with Masking Sol NEO to try and prevent any paint bleeding.


Here is the newly painted symbol. I'm pleased that for the most part, the masking held up really well, and there are only a few small sections that will need touch-ups.

I wanted to create a dusty red for these sections so I tried a few mixtures and eventually, I stumbled on this color. It is 6 drops of Tamiya XF-7 Flat Red, 1 drop of XF-4 Yellow Green, and 1 drop of X-6 Orange. I'm very pleased with this color as it's much more subtle red than using only XF-7, but it's still bright enough when you see it on the rest of the model.


I painted a few other areas with the Dusty Red. The extra racing stripes in front of the gun turret should help the Envoy fly faster. And on the F-Toys Stellar Envoy, they added a few sections of red to the mandibles. I thought that this looked really nice so I added it as well.


I think, and I hope, that I'm now done with masking and painting. As much as I love sitting and meshing colors together with my airbrush I think I'm ready to move on to something else with this project.

Next, I'm going to be adding a gloss coat to all of the newly painted sections, as it's now time to begin weathering. And that is going to take me a while to do with such a large model. That being said it's also going to be a lot of fun to do.

In the meantime, I think I'll also get a restock on my masking tape!

To be continued...