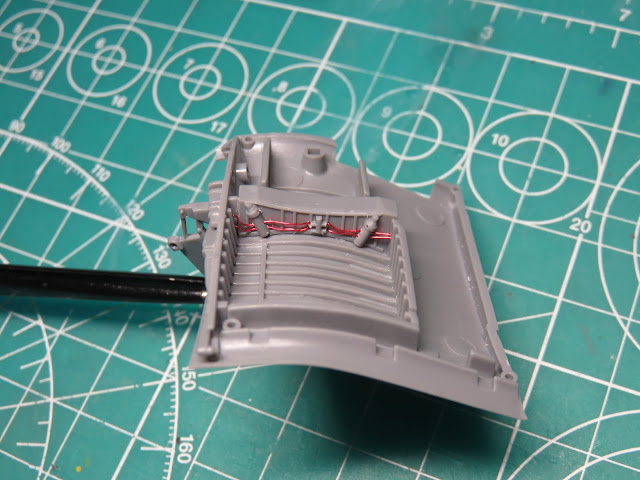
I was still having fun adding extra details to this project. Keep in mind I've added these modifications solely for my own satisfaction. I decided that I'd like to add some extra details to the landing gear bays by adding in some of the wires. I added as much as I thought I could without driving myself too crazy dealing with a small scale.
The most difficult task was deciding which wires I was going to add and where they were going. Again the scale played an important factor in deciding which wires to use, and thanks to some great aviation enthusiasts, there were a lot of pictures documenting the Corsair for me to reference.
Once I had decided which wires I was going to use and plotted where they were going to go. I began by carefully drilling out the holes. Some of these were tricky to drill out, as seen above with the holes drilled out behind the cylinders.
I drilled out smaller holes that would pass through some of the frames. These were carefully drilled out and will add some really nice stability when I eventually add in the wires. I want to also note that there are some really ugly-looking ejector pin marks that I scraped down prior to adding in the wires. These pin marks weren't too difficult to remove using a curved blade in my hobby knife. After I had the pins scraped off I sanded the area with 600 grit Tamiya Sand Paper.
I used 0.20mm Magnet Wire and some more Mr. Just Super Glue to keep the wires fixed in place. The wire is really easy to bend around, and with pointed tweezers, I was able to guide the wires from the center junction to the outsides of the gear bay. I was pretty pleased with how the wires looked going through the back of the cylinders.
The next wires ran through the wing spar, and I really liked how busy the gear bay was starting to look. It took time to lay down each wire and wait for the glue to dry, but once this is painted these details will really stand out.
Lastly, I added a few more wires to the back of the gear bay. Like before these would run through a wing spar. There were a few times when I got frustrated with the wires, or the super glue wouldn't dry fast enough, but I think it was worth all of the fuss.
I was going to paint the insides of the gear bays after I had painted the exterior of the model. But when I test fitted the lower wing section I realized that I might not get every corner or I might spray green onto a nice blue finish. So I painted Mr. Color 351 Zinc Chromate Green, which allowed me to see how the inside looked all painted. I'm really happy with the results, and it will look even better later on when a wash is added to pop out all of those new details.
I turned my attention to the tail wheel. There are long flat bracers on this piece, and these should have openings to them. I used my standard Tamiya Pin Vise to carefully drill out the holes. A bit of a bonus, there are a lot of seam lines to clean up on the tail wheel, so all I needed to do was drill along that seam line and I was able to keep the holes level.

Drilling out these holes was a really simple way to add some extra detail to this model. It's not immediately noticeable, but it looks so much better than before.
Again looking at the reference picture I showed in Part 2, you will notice that the gun covers are taped over. This was done so that nothing would fly into the gun barrels before they were fired and could end up jamming the machine gun. They also marked to indicate that the aircraft had live ammunition.
I used thin Evergreen Styrene, 0.25mm, and cut out six small squares. I then glued these into place using Mr. Cement SP, and after the glue had dried I sanded them down to further thin down the plastic.
Later on in the build when the rest of the aircraft has been painted I'll come back and paint these white.
I've never been a fan of adding drop tanks to my models, I don't know why, it's just one of my many quirks. But after some deliberation, I decided to add them to my Corsair. But I noticed that they were missing the fuel caps.
After some online searching, I finally found a good picture of the fuel caps and their placement. I drilled out an opening on both of the drop tanks.
I used a leather punch to cut out some disks from styrene. I glued these disks to the opening and then cut out the center to match the previously drilled out hole. I then glued a thin piece of styrene to the inside of the tank so that the new fuel cap wouldn't fall through.
I used the leather punch again to cut out thicker pieces of styrene that would act at the fuel caps. These sections later on will be painted a bright red. There were some more additions that I could add to the rear sections of the tanks, but since the model is going to be built with the flaps folded down they wouldn't really be seen so I've left them off of the model.
These modifications were a lot of fun to add to the model, and I've still got some more modifications to add. Next, I'll begin work on the tires and the main landing gear sections.
To be continued...


No comments:
Post a Comment