I've wanted to build a ship for a few years now. I bought the new tooled Tamiya 1:350 Yamato, opened it and was floored by the mass amount of plastic and intricate details. I really felt overwhelmed, by the kit alone, and still don't have the courage to start that one.
So I bought their older tooled 1:350 Musashi. And at the same time bought this 1:700 Yamato for my younger brother. But he felt it was a bit above the modeling he wanted to do. So I asked him if I could build it for him. And I was pleased he said I could.
I really like this kit straight from the box. It's got some great detail, the smaller parts are really nicely detailed, and over all the kit looks really fun and simple. However I really wasn't happy with the crane tower in the back. It's a thick solid pyramid, and It just kinda killed realism of the miniature and turned it into a toy. Again this is just me. I found out that Fine Molds make a photo etched fret for $20, featuring the crane and a few other small details for the back of the ship.
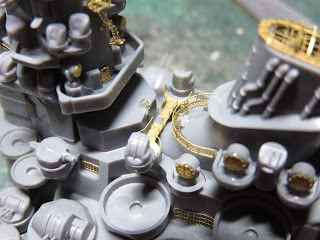
When I wen to buy i is was sold out on amazon.ca, so I went to ebay, and instead found a larger fret with more details, from a Chinese seller. This alternate fret contained metal for the tower, and the radar mesh. I was quite excited to add a few more details, but when I finally got the set, I discovered there were 4 frets, including some very nice railings.
Sadly the instructions were very vague and only gave instructions on about a 1/4th the etched material. That and the brass was very thin and fragile, I damaged a few parts well beyond repair simply cutting them off the sprue. And cleaning the barbs was difficult without damaging the kit.
Any ways this is the most etched parts I've ever used and it was quite fun, now I'll show you the build.
Sanding down the rear deck for the new etched plate.
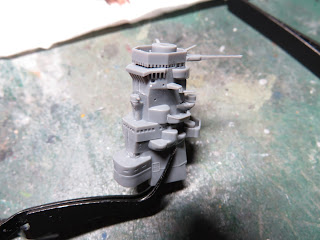
Funnel assembly, Note the thin line on the funnel for black paint
Didn't know if I'd get these parts on top. Not nicely curved, but I think it looks pretty good.
Not that the original plastic parts were that bad, but these look awesome.
I lost one of these stairs on the rug. Pure panic mode for 15 minutes.
First layer Tamiya XF-78 Wooden deck tan, with brown added in
I then masked off various panels
Next coat XF-55 Deck tan with XF-78 add in.
Masked off again.
Finally all painted XF-78
Masking removed. The lighter color, is too light, but the darker ares look nice.
Late version aft deck, lots of glue used here.
Masking off the deck.
Burnishing the tape down with a q-tip
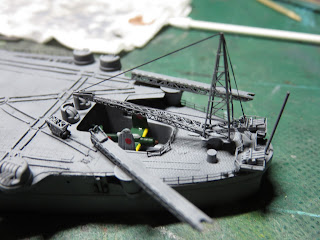
Stitch offering a hand while the glue dries on the rear crane.
A part I thought they left out, this bridge.
1st catapult
Really thrilled with this piece, the crane is completed.
After it's painted I'll add EZ line for the ropes.
Main antenna masts in place.
The rails were incorrect in their size and would not stay straight.
Plus the brass was too fragile for me to handle. So I instead
opted to use a very thin wire. This worked quite well with the
exception of the plastic coating around the wire, battling me
a bit to stay in place. A bit too big for the scale , but I'm pleased
with the end result.
My Elephant turret.
More AA batteries were added on the later version of the Yamato
Decided to add a few rails.
These were quite easy to add on. And they were steel, so they much stronger...
..which was nice since they would have broken off a few times
if they were brass, my clumsy fingers and all.
Handing these over to my brother for painting,
It's technically his model, so he should help out a bit right?
"Look at all those guns"
Little airplane trolley
The kit includes some big thick bars to serve as weights.
I wasn't going to use them for anything else, so in they went.
In preparation for painting.
My painting arsenal,
OK, let's paint this thing.
Began by priming Mr. Surfacer 1200 to the entire model.
This primer really caught the small details.
I decided to first paint XF-77 as it's a darker grey, and
progress to the lighter grey paints.
Next came the XF-75, being sure to keep the XF-77 visible
in the mix. I thinned the XF-75 down quite a bit, and lightly
painted the entire model a rather blotchy appearance.
I made several passes of the XF-75, each time adding in
a bit of flat white to brighten the grey. And focused on
painting area's of the model that were on the surface, like
the tops of the turrets.
These 1:700 planes were kindly painted by my younger
brother. The hinomaru's decals were too big, so I asked
if he would be able to paint them on. All three of these
turned out way better than I had expected.
Getting prepped to be put on the deck. I cut the wings,
and posed them folded. I was surprised that the plane
barely fir in there. And also at this point I realized Tamiya
didn't mold in the doors that would be behind the aircraft.
A bit of EZ line, and it's set to go.
I dry brushed a Vallejo light grey on the top details.
Mainly hoping to catch the angles around the ship.
This also help expose some of the details on the grey
deck that would otherwise be hidden.
The Imperial War flag, securely glued on with the help
of UHU Black glue.
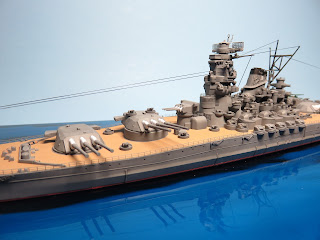
This was a very fun project. I enjoyed it a lot, even all the hassle with the etched parts. The brass was too thin for me, and this made it difficult to work with, especially the tiny stairs on the back of the superstructure. But I'm glad I decided to buy it and use as much as I could on the model. It was a good practice, not something I'll add to every model, but a nice addition to this mega ship.
The deck didn't turn out as nice as I'd imagined, but it was one on those cases where I really needed to try it, and learn from the experience. And I can surly say I learned a lot by painting that. And by blending all the different grey paints together. I think that turned out pretty well, but would have been more noticeable on a bigger model.
This kit and experience was definitely the thing I needed before I tackle the bigger 1:350 Musashi and Yamato. On it's own this kit is a blast, but the added etched parts to me made this project a bit more special. I doubt I'll buy a big etched set like this again for a 1:700 scale kit. But I think the necessity for my models, will be at least to add the railing. To me it's the most notable part of the build and helps bring the kit into the scale.
I hope you've enjoyed this build, and my thanks for taking time to look this over.


